How to Create Model Context Protocol (MCP) Server in C# and Run in VS Code

The Model Context Protocol (MCP), open-sourced by Anthropic, solves this by defining an open standard for how AI applications secure-connect to external tools and data sources.
In this tutorial, we will walk through how to build a high-performance MCP Server using C# and .NET 10, and how to test and run it directly within Visual Studio Code.
What is MCP?
The Model Context Protocol (MCP) is a client-server architecture:
- MCP Client: An AI application (like Claude Desktop, cursor, or VS Code extensions like Roo Code/Cline) that wants to leverage tools or context.
- MCP Server: A lightweight service that exposes specific capabilities (tools), resources (data/files), or prompts to the client.
- Transport: Standard I/O (stdio) or SSE (Server-Sent Events) over HTTP. For local setups, stdio is the standard.
Step 1: Create the Project
First, let's set up a new .NET 10 console application. Run the following commands in your terminal:
# Create a new console app
dotnet new console -n MCPServer_Test
cd MCPServer_Test
Adding NuGet Dependencies
Add the ModelContextProtocol nuget package (a library for hosting MCP in .NET) and the Hosting extensions (Microsoft.Extensions.Hosting). After adding package your project file should look like this:
xml
<Project Sdk="Microsoft.NET.Sdk">
 <PropertyGroup>
   <OutputType>Exe</OutputType>
   <TargetFramework>net10.0</TargetFramework>
   <RootNamespace>MCPServer_Test</RootNamespace>
   <ImplicitUsings>enable</ImplicitUsings>
   <Nullable>enable</Nullable>
 </PropertyGroup>

 <ItemGroup>
   <PackageReference Include="Microsoft.Extensions.Hosting" Version="10.0.8" />
   <PackageReference Include="ModelContextProtocol" Version="1.3.0" />
 </ItemGroup>
</Project>
Step 2: Configure the MCP Server Host
MCP communication over stdio relies on the standard input (stdin) and standard output (stdout) streams to pass JSON-RPC messages.
Let's configure our host in Program.cs:
using Microsoft.Extensions.DependencyInjection;
using Microsoft.Extensions.Hosting;
using Microsoft.Extensions.Logging;

namespace MCPServer_Test
{
   internal class Program
   {
       static async Task Main(string[] args)
       {
           var builder = Host.CreateApplicationBuilder(args);

           // Redirect console logs to stderr so stdin/stdout are clean for MCP

           builder.Logging.AddConsole(consoleLogOptions =>
           {
               consoleLogOptions.LogToStandardErrorThreshold = LogLevel.Trace;
           });

           // Register MCP Server services

           builder.Services
               .AddMcpServer()
               .WithStdioServerTransport()
               .WithToolsFromAssembly();
           // Run the host
           await builder.Build().RunAsync();
       }
   }
}
Step 3: Define Your MCP Tools
Now, let's define the tools that our server will expose to the AI client.
With the ModelContextProtocol SDK, you can mark a class with [McpServerToolType] and define static methods marked with [McpServerTool]. The SDK will auto-discover these and expose them to the client.
Create a file named MCPClientTool.cs:
using ModelContextProtocol.Server;
using System.Collections.Generic;
using System.ComponentModel;

namespace MCPServer_Test
{
   [McpServerToolType]
   public static class MCPClientTool
   {
       // Tool 1: Sum two numbers
       [McpServerTool, Description("Sums two numbers.")]
       public static int Sum(int a, int b)
       {
           return a + b;
       }

       // Tool 2: Multiply two numbers
       [McpServerTool, Description("Multiplies two numbers.")]
       public static int Multiply(int a, int b)
       {
           return a * b;
       }

       // Tool 3: Fetch list of names
       [McpServerTool, Description("Fetches a sample list of family names.")]
       public static List<string> GetFamilyName()
       {
           return new List<string>
           {
               "Smith",
               "Johnson",
               "Williams",
               "Brown",
               "Jones"
           };
       }
   }
}
Compile the project to verify there are no compilation errors:
Step 4: Testing Your MCP Server in VS Code
You can test this MCP server in VS Code. To run project locally we just need to add new server in our mcp.json file in .vscode folder or user settings:
Below steps will perform to add MCP server into VS Code
- Press Ctrl+Shift+P to open the User Configuration
- Now add below json into mcp.json file
{
    "inputs": [],
    "servers": {
        "MCPServerTest": {
            "type": "stdio",
            "command": "dotnet",
            "args": [
                "run",
                "--project",
                "D:\\Practice Project\\MCPServer Test\\MCPServer Test\\MCPServer Test\\MCPServer Test.csproj"
            ]
        }
    }
}
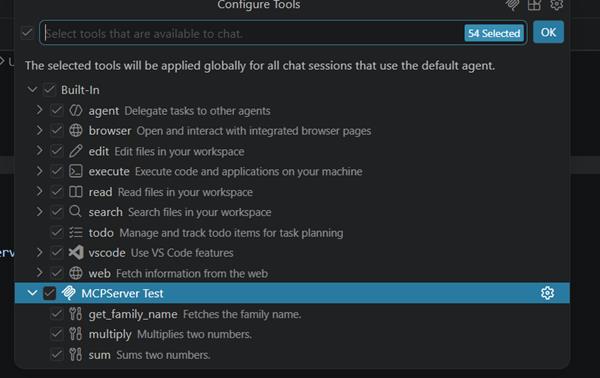
When we go into GitHub Copilot and toggle on Agent mode, we will see our new tool configured:
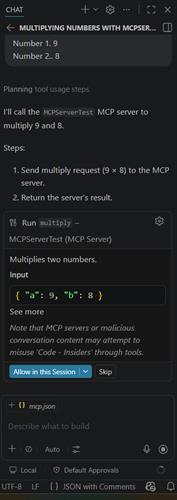
For testing newly added MCP server, just opening the GitHub Copilot we can now ask it to multiply the number by using MCP server for us. This will prompted for permission to execute the call to the tool:
Best Practices and Tips
- Output Redirecting: Always make sure standard output is reserved strictly for JSON-RPC messages. Do not use Console.WriteLine inside your C# tools to log info, as it will corrupt the JSON stream. Instead, use the .NET ILogger or write custom logs to Console.Error.WriteLine.
- Method Signature: The parameters of your C# methods become the tool inputs. Always provide a [Description] attribute for your tools and parameters so the LLM understands exactly when and how to call them.
- Error Handling: Throwing exceptions inside your tool methods is handled gracefully by the MCP SDK and returned to the client as tool errors.
Conclusion
Creating an MCP server in C# using .NET 10 is fast, type-safe, and highly scalable. By bridging the gap between LLMs and local .NET logic, you can easily build powerful custom agents that automate complex tasks, interact with databases, or manipulate your local file systems.
Happy coding!
Comments
|
|
|
| Follow up comments |
| {{e.Name}} {{e.Comments}} |
{{e.days}} | |
|
|
||
|
|
||
| {{r.Name}} {{r.Comments}} |
{{r.days}} | |
|
|
||